Sunday, November 30, 2014

Vintage Glitter Bulbs

Remember these fun holiday bulbs? Some of you may even still decorate with them! I decided to give them a fab makeover!

Unscrew the bulbs, and coat each one with some Elmers glue. Sprinkle glitter all over & tap to remove excess.

Set to dry & figure out how you will display these sparkling beauties!

On a wreath?
In a bowl?
Gift tags?
Ornaments?

So easy to make & I love the retro feel!

Pin It

Wednesday, November 12, 2014

Thanksgiving Pilgrim Hat Crayon Holder

Thanksgiving is right around the corner & I need some projects to keep my little one busy while we're visiting family. Paper placemats & this pilgrim hat filled with crayons is sure to do the trick!

What you'll need:
Black cups
Black paper
Scrapbook paper
Hot glue gun

Simply cut the bottom out of a black cup (I only had white cups so I sprayed mine with chalkboard paint). Hot glue the cup upside-down to a circle shaped piece of black paper. Cut a band for around the cup & add a scrapbook paper square for the buckle. Simple!

 These would also be adorable at each place setting to hold disposable silverware setting or fill them with candy treats!

Happy Thanksgiving!

Pin It

Friday, October 31, 2014

Halloween Tic Tac Toe - Sugar Free Treat

I love playing games with my daughter. Our latest obsession is tic tac toe. It's great because we can challenge one another to a game virtually anywhere!

When it came time to make Halloween treats for her class (which must be sugar-free) I thought a mini tic tact toe set for each child would be perfect!

 I designed the tic tact toe boards and added fun & spooky bag toppers. Keeping with the Halloween theme, I found some cool bone candies to use as the X & O pieces.

 Hopefully this will get her classmates and their parents (or siblings) playing together and creating memories to last a lifetime!

Happy Halloween!

Pin It


Saturday, October 11, 2014

Halloween Ghost Feet

I love this time of year! My little gal and I have so much fun doing craft projects together. When I saw this idea posted on Pinterest, I knew we had to give it a whirl.

We started off with a canvas and painted it black.

Next we made a puddle of white paint for her to wiggle her foot in. She giggled and had a blast. Next carefully place each foot down onto the canvas.

We added some googly eyes, adhesive letters and glitter paint 
(cause everything we do has to sparkle, even ghosts)!
She wrote her name and dated the back of the canvas.

Last, I attached some ribbon using my staple gun so we could hang it!

Easy peasy! I love that every Halloween we'll have a special decoration to cherish from when she was little :)

Pin It


Sunday, September 28, 2014

Sugar-Free Halloween Treats - Pumpkin Crayons

Fall is finally here & I'm in full force holiday craft mode! Woot!
I wanted to share my daughter's classroom treat we did last year. Her school is sugar-free so I was faced with a challenge to come up with a cool idea!  

 While I was racking my brain for a sugar-free classroom treat, my lil gal lost another tooth. Eek! I told her she had the perfect pumpkin smile & then an idea dawned on me...
Boxes of crayons disguised as pumpkins!

Sugar-free & what kid doesn't love crayons? A win-win to me :)

Five made and twenty-one (!!!) more to go!

What you'll need:
Box of crayons
Scrapbook paper
Glue stick
Paper punches (1-hole, circle & scallop)
Bakers twine (or make your own here)

Two of the scrapbook papers I used are available to download for free:
Pumpkin face template
Get the adorable gift tag & other Halloween free printables here!

 Happy Halloween my pretties!

Pin It


Tuesday, September 2, 2014

First Day of School Treats

Hope you had an amazing summer! 
I can't believe a new school year is here! Isn't it crazy?

My little gal was nervous returning to school so we decided to make some treats for the staff.

I designed these fun tags and we put together these little treat bags filled with yummy caramel candies! On her first day of school we distributed them to our crossing guard, office staff, cafeteria workers and her new teachers. It gave her a chance to greet them & ease some of her nerves. Plus I'm sure the staff all appreciated a little sweet treat that they can indulge in at the end of the day.

Hope you & your little ones have an amazing school year!

Pin It


Sunday, June 1, 2014

Have A Krazy, Kool Summer!

 I can't believe the school year is coming to an end. I'm super emotional my sweet baby will be heading off to second grade in the fall. Where does the time go? I tell her daily she isn't allowed to grow up, but she just doesn't listen :)

 I wanted my daughter to give her classmates one final gift as they head off on summer vacation. We took some silly crazy straws, packets of Kool-Aid & added a fun printable.


 Super easy & inexpensive! Plus who doesn't love a crazy straw?

Wishing you all a krazy, kool summer!

Pin It

Monday, May 26, 2014

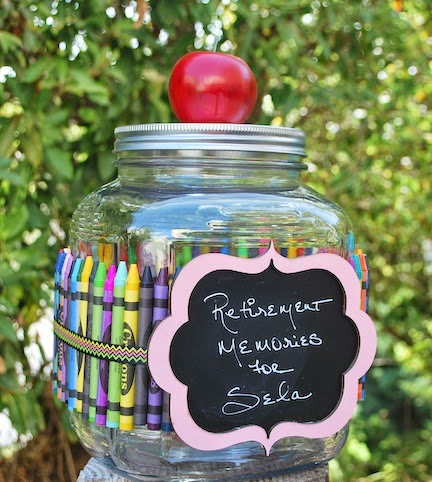
Teacher Retirement Memory Jar

My daughter's school has three wonderful faculty members retiring this year; a kindergarten, first grade and second grade teacher.

The PTA commissioned me to create special gifts for each of them. Since they all have worked at the school for many, many years, what better than memory jar filled with all their awesome moments to be cherished for years to come! 

While a plain jar would have been fine, I wanted the jars to be displayed in their homes so they needed to be decorative & cute! I added some crayons, ribbon, faux apples & fun chalkboard signs.

Each jar was slightly unique & perfect for each teacher. I'm so happy with how they turned out and can't wait for them to be presented at their big retirement celebration.

 
Pin It

Wednesday, April 16, 2014

Chocolate Birds Nest

These sweet little chocolate birds nests are a perfect decoration and dessert for Easter! 

 1 bag chow mein noodles
3 packages mini chocolate bars
1 bag Cadbury mini eggs (or jelly beans)
Mini muffin pan
Cooking spray
Wax paper  (optional)

1. Break up chocolate and place in a microwave-safe container. Heat the chocolate in 30 second intervals until thoroughly melted. Be careful to not burn the chocolate. It took me two 30 second intervals.

2. Carefully add the chow mein noodles, stirring until completely coated in the chocolate. 
 
3. Lightly spray mini muffin pan with cooking spray.

4. Spoon mixture into mini muffin pan. (note: if you don't have a mini pan, you can also spoon it into little nests onto the wax paper)

5. Refrigerate until firm, about one hour or so.

 6. One chilled, gently remove the nests from muffin pan. I used a paring knife to pop them out.

7. Place three Cadbury mini eggs (or jelly beans) inside each nest.
 Hope you have a fabulous Easter!

Pin It


Sunday, March 16, 2014

Lucky St. Patrick's Day Fortunes

I love to bring treats to my daughters classroom for any & every holiday. St. Patrick's Day is no different. I found these silly green fortune cookies from Oriental Trading and made a fun printable that I attached to them! Easy peasy.

I think the kids will get a kick out of cracking them open & reading their St. Patrick's Day message!


Pin It

Thursday, March 13, 2014

St. Patrick's Day Clover Hair Clip

St. Patrick's Day is right around the corner & I want to make sure my daughter and her girlfriends avoid the celebratory pinches from classmates. 

With some green felt, ribbon and crystal embellishments I whipped up these fun clover hair clips!

100% leprechaun approved!

Pin It


Sunday, March 9, 2014

Pinch Proof St. Patrick's Day!

I love to celebrate St. Patrick's Day! A day filled with leprechauns, rainbows and pots of gold - yes please! Plus do I even need to mention Shamrock Shakes? I've been indulging on them for the last few days! Yum!  

I'm always looking for an excuse to make goodies for friends! This year I decided to make some 'pinch proof' St. Patty's gifts. I purchased some sparkling green nail polishes and attached a fun little tag. Now they'll be sure to be safe from any feisty pinchers!


Do you join in on the green festivities on St. Patrick's Day?

Pin It


Friday, February 28, 2014

Dr. Seuss Green Eggs and Ham

I will eat them in the car
I will eat them going far
I will eat these green eggs and ham
Thank you, thank Sam I Am!

What you'll need:
 Pretzels
Wilton white chocolate melts
Green M&M's
Spread wax paper on a cookie sheet and lay out pretzels on paper. Add one chocolate melt on top of each pretzel. Stick in 350 degree oven for five minutes. 
 Make sure your assistant doesn't eat all the ingredients.

Immediately remove from the oven and press a green M&M on top of chocolate melt. Put in fridge to harden candy.

That's it. Easy peasy right?

I created this bag topper & packaged them up for my daughter's classroom!

Happy Birthday Dr. Seuss!

Pin It