Showing posts with label decor. Show all posts

Sunday, November 30, 2014

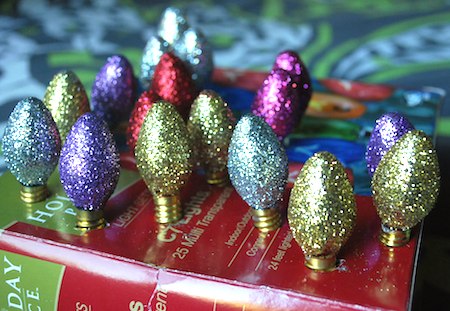
Vintage Glitter Bulbs

Remember these fun holiday bulbs? Some of you may even still decorate with them! I decided to give them a fab makeover!

Unscrew the bulbs, and coat each one with some Elmers glue. Sprinkle glitter all over & tap to remove excess.

Set to dry & figure out how you will display these sparkling beauties!

On a wreath?
In a bowl?
Gift tags?
Ornaments?

So easy to make & I love the retro feel!

Pin It

Sunday, January 29, 2012

DIY Chalkboard Picture Frame

Looking for a unique and homemade Valentine's Day gift?
How about a chalkboard picture frame? Now you can leave love notes for your sweetie all year long!

First you'll need a cute assistant and a wooden picture frame. We picked this one up at Michael's for just $1. I like that it has a large area to write your message!

You'll also need a can of chalkboard spray paint (available at Michael's)

Now get spraying! I applied three coats (allow for drying in between coats)

A few rhinestone added for a sparkling finish touch and that's it!
Quick, easy & your Valentine is sure to love it!

These would also make amazing wedding favors. Attach a piece of chalk with coordinating ribbon and you've got a one-a-kind favor for your guests.

Pin It


Sunday, July 10, 2011

3D Hanging Doilies

These aren't your grandma's doilies! With just some food coloring, glue & string turn drab paper doilies into festive party decorations. A great alternate to paper lanterns or tissue pom-poms.
I'm excited to make these. So girly. So easy to make. So much fun.
Get the instructions from Lisa Storm over at Ucreate HERE!

Wednesday, April 13, 2011

DIY Paint Chip Easter Garland

What a fun & creative idea!
I've been on the hunt for modern (non-cheesy) Easter decorations and this is garland is perfect! Made from paint chip cards (available at your local hardware store) there are so many color possibilities. Plus paint chips are free so this a no-cost project! Woot!
Get the details from Modern Parents Messy Kids HERE!

Tuesday, February 1, 2011

DIY Valentine Heart Garland

Love is in the air, can you feel it?
I'm so excited for Valentine's Day this year. I love love! And now that my little girl is old enough to do crafts, we've been doing a fun new project almost every day (whew)!

To make the garland, you'll just need a few items:
Cardstock Paper
Paper cutter or scissors
Hot glue gun (or glue dots if little ones are helping)

First cut the cardstock into strips. I made ours about 3/4"

Next fold the strips in half

Fold the two ends and apply a dab of glue to hold the center pieces together. Now you've got yourself a heart. Repeat (again and again...)!

Once you've made a plethora of hearts, apply a dab of glue on the outside of one heart and attach another. Repeat until you've made the garland your desired length.

That's it! So bright, colorful & fun! We made this garland in about 30 minutes & cost less than $0.20!
We took it to her school and it's now proudly displayed in her classroom! The kids loved it. Yeah!

Tuesday, January 25, 2011

DIY Chalkboard Picture Frame

Looking for a unique and homemade Valentine's Day gift?
How about a chalkboard picture frame? Now you can leave love notes for your sweetie all year long!

First you'll need a cute assistant and a wooden picture frame. We picked this one up at Michael's for just $1. I like that it has a large area to write your message!

You'll also need a can of chalkboard spray paint (available at Michael's)

Now get spraying! I applied three coats (allow for drying in between coats)

A few rhinestone added for a sparkling finish touch and that's it!
Quick, easy & your Valentine is sure to love it!

These would also make amazing wedding favors. Attach a piece of chalk with coordinating ribbon and you've got a one-a-kind favor for your guests.

Tuesday, January 11, 2011

Brick Succulent Planters

I adore this simple & modern planter idea! As someone who missed out on the green thumb gene, I have a fondness for succulents. It's almost impossible to kill them. And now you can create a fun (and inexpensive) planter. I prefer to recycle an older brick. Not only is it eco-friendly, but used bricks has lots of charm & character.
  1. Use a C-clamp to stabilize your brick. Mark the center with a pencil and then spray the top of the brick with your squirt bottle. When drilling masonry, you've got to keep it wet.
  2. Grab some safety googles, drilling brick can be messy & hot!
  3. Position your drill in the center of one side of your brick and try to keep the drill level. Every 20 seconds or so, spritz with water to keep the drill bit cool. Once the outer diameter of the hole cutter contacts the brick, spray a lot more water on, and keep drilling until the loose dusty shavings/water mixture starts to dry out. Keep drilling, and spraying and drilling.
  4. When the base of the hole cutter starts to get close to the brick surface, stop drilling. Take a chisel and carefully knock away the interior of the hole. Don't hit too hard or the brick might split. Just tap away enough until the bottom is flat(ish). Shake out the loose stuff. Repeat if necessary.
  5. Do the same thing with the second hole.
  6. Spray off all the brick dust and put a bit of dirt in the bottom of one or both of the holes, about 3/4" deep. Place a succulent into each hole, and pat more dirt loosely around.
  7. Water once to every two weeks.
  8. Enjoy the beauty of your hard work!

Photo via ReadyMade

Sunday, October 17, 2010

Coffee Filter Cobwebs

Create Halloween cobwebs using household coffee filters. Cute, easy & inexpensive. Get the details from Mega Spooky HERE!

Sunday, September 26, 2010

Ghost Leaves Kids Craft

Boo! Say hello to our new ghost friend created with leaves. Cute huh! Want to make some with your little gobblins? Super easy & so much fun. Let's get started.

You'll need white paint, brush, wiggly eyes, glue and silk leaves (we used small & large sizes).

Paint both sides with the white paint. Let dry & glue on the eyes.
That's it! Super fun Halloween decorations your kids will love to show off!

Love how the ends of the leaves started to fray. Adds to the spookiness!


She's so proud! We hung the big guys in our front window and made a garland with the little ones for her room.

Hope you'll try making a few to add to your Halloween decor!
Thanks for stopping by!

I'm linking to these fabulous blog parties!

Thursday, July 8, 2010

Give A Hoot Pillow

Get the tutorial to make this adorable owl pillow from Just Another Hang Up. And be sure to take a peek around the blog, it's filled with so many gorgeous pillows!


P.S. - I have a fun announcement to share tomorrow!

Sunday, May 30, 2010

DIY Flower Pillows

I'm such a sucker for big flowers, I blame it on my inner Carrie Bradshaw! Now you can make your own fabulous flower pillows with these incredible tutorials. Hello Gorgeous!

Stunning! Get the tutorial from Cluck. Cluck. Sew at V and Co.

Get the details to make this beauty at Love Stitched

Wednesday, February 24, 2010

Chic Pillows


These pillows have some of my current favorite things: chiffon flowers, sweet modern fabrics and felt flowers. Watch the video tutorial from The DIY Dish & learn how to make these gorgeous pillows. The best part, they've shared the pattern for the creamy white felt flower (shown above). Get it here.

Friday, June 26, 2009

Ready. Set. Paint!!!


Glidden is giving away a quart of paint. Pick out your favorite paint color and Glidden will send you a FREE quart. Ohhh let the painting begin! Click here for details.

Monday, May 18, 2009

Eco Chic


Can you guess what this chic & innovative hurricane cover is made from?

Paper towel tubes!

I found this adorable idea at A Little Hut.
All you need is:
- 2 paper towel cardboard tubes
- scissors
- glue
- two letter-sized sheets of office paper
- tape
- 4.5" x 9" (11.4cm x 23cm) glass hurricane

1. Press and crease the cardboard tubes lengthwise. Cut the cardboard into 1/8" (4mm) slices. You will need 84 rings.


2. Arrange the rings in a pattern where there are alternating rows of 4 and 3 rings.


3. Attach the rings, by placing small dots of glue (shown in red) on the four outer sides of each ring that are adjacent to four additional rings. Only add glue to two points (shown in green) on the outer side of the rings used for the top and bottom rows of the cover.


4. Cut about 1" (2.5cm) off the short end of each of the sheets or enough to make them flush to the height of the rings. Tape the two sheets together along the long sides and secure them around the hurricane.
5. Once the attached rings are completely dry attach the opposite columns of rings to form a tube. Allow more drying time and hold with a paper clip or something similar while it dries.
6. Slide the tube of rings over the paper-covered hurricane.