Showing posts with label craft. Show all posts

Thursday, October 24, 2013

Witch Hat Tee

Add a touch of magic to your little ones wardrobe with a witch hat tee! 

Inspired from an adorable tee I saw from Izzy & Ivy, I followed their hat template as my guide. 

 You'll need: 
Halloween fabric
Fusible webbing
Embroidery thread
 Button
Scissors
Iron

The whole thing took less than an hour to create. And aside from the spiders legs & web no other sewing was involved! Woot!

Add a tutu & pair of leggings and you've got one cute Halloween outfit!

Pin It


Tuesday, October 8, 2013

Pumpkin Crayons

Fall is finally here & I'm in full force holiday craft mode! Woot!
My Halloween candy idea came to a screeching halt when I discovered my daughters school is sugar-free!  

 While I've been racking my brain for a sugar-free classroom treat, my lil gal lost another tooth last night. Eek! I told her she had the perfect pumpkin smile & then an idea dawned on me...
Boxes of crayons disguised as pumpkins!

Sugar-free & what kid doesn't love crayons? A win-win to me :)

Five made and twenty-one (!!!) more to go!

What you'll need:
Box of crayons
Scrapbook paper
Glue stick
Paper punches (1-hole, circle & scallop)
Bakers twine (or make your own here)

Two of the scrapbook papers I used are available to download for free:
Pumpkin face template
Get the adorable gift tag & other Halloween free printables here!

 Happy Halloween my pretties!

Pin It

Saturday, December 1, 2012

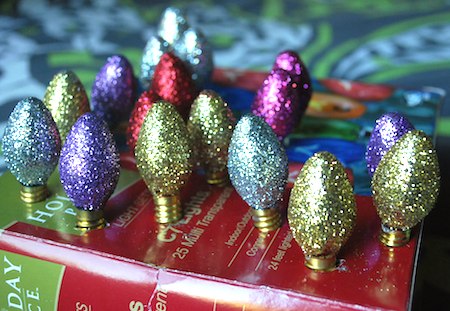
Vintage Glitter Bulbs

Remember these fun holiday bulbs? Some of you may even still decorate with them! I decided to give them a fab makeover!

Unscrew the bulbs, and coat each one with some Elmers glue. Sprinkle glitter all over & tap to remove excess.

Set to dry & figure out how you will display these sparkling beauties!

On a wreath?
In a bowl?
Gift tags?
Ornaments?

So easy to make & I love the retro feel!

Pin It

Sunday, September 23, 2012

Pumpkin Crayons


Fall is finally here & I'm in full force holiday craft mode! Woot!
My Halloween candy idea came to a screeching halt when I discovered my daughters new school is sugar-free!  

 While I've been racking my brain for a sugar-free classroom treat, my lil gal lost her first tooth last night. Eek! I told her she had the perfect pumpkin smile & then an idea dawned on me...
Boxes of crayons disguised as pumpkins!

Sugar-free & what kid doesn't love crayons? A win-win to me :)

 Five made and nineteen (!!!) more to go!

What you'll need:
Box of crayons
Scrapbook paper
Glue stick
Paper punches (1-hole, circle & scallop)
Bakers twine (or make your own here)

Two of the scrapbook papers I used are available to download for free:
Pumpkin face template
Get the adorable gift tag & other Halloween free printables here!

 Happy Halloween my pretties!
 
Pin It


Tuesday, July 31, 2012

Free Vintage Printable Set


I simply adore the vintage camera, dress form & sewing machine print trio from Printable Decor! Just download, print & pop into frames. A fabulous (& inexpensive) way to add a pop of color to any craft room! Get the free printables HERE!

Sunday, January 29, 2012

DIY Chalkboard Picture Frame

Looking for a unique and homemade Valentine's Day gift?
How about a chalkboard picture frame? Now you can leave love notes for your sweetie all year long!

First you'll need a cute assistant and a wooden picture frame. We picked this one up at Michael's for just $1. I like that it has a large area to write your message!

You'll also need a can of chalkboard spray paint (available at Michael's)

Now get spraying! I applied three coats (allow for drying in between coats)

A few rhinestone added for a sparkling finish touch and that's it!
Quick, easy & your Valentine is sure to love it!

These would also make amazing wedding favors. Attach a piece of chalk with coordinating ribbon and you've got a one-a-kind favor for your guests.

Pin It


Sunday, January 15, 2012

Recycled Crayon Valentines

Ever wonder what to do with all those broken & half used crayons? Now you can recycle them into fun shapes.

I didn't want my preschooler to bring candy to her classmates for Valentine's Day, so this is a perfect alternative!

All you need is crayons, a silicon baking pan & oven.
Let's get started!

Set your oven to 200 degrees. Remove the paper wrappings and break up the crayons. Add them to the silicon molds and place in oven for 8-10 minutes.

Once all the crayons have melted, you'll get something like this. Next throw the mold in the freezer for a few minutes so the crayons can harden faster.

Pop them out of the mold & you've got yourself some super cute new crayons!

We printed these free cute cards from The Long Thread. A small piece of tape or dab of hot glue holds them onto the card.

We wrapped them in cellophane treat bags and added some ribbon.
A great Valentine treat without any sugar involved!

Wednesday, November 30, 2011

Santa Christmas Countdown Printable

Get this free adorable Santa Christmas Countdown from
inviting printables! Each day the kiddos (or adults) glue a cotton ball to his beard & when it's full Christmas is here!

This year my has daughter has developed an extreme fondness for advent calendars (we have already purchased three!) but I'm beginning to think her obsession is just for the daily chocolate treat inside so I'm particularly excited about this sugar-free version!

Get the printable here & let the count down begin!

Sunday, November 13, 2011

Gobble! Turkey Hand Tee

Here's a modern twist to the Thanksgiving hand turkey! My daughter and I made this last year and we had so much fun I wanted to share it again!

Look at that sweet little face! I can't believe how fast she's growing up!

We followed the tutorial from Treasures For Tots as our guide. Using fabric scraps, ribbons & buttons, we made the whole thing in less than one hour & the best part...
No sewing involved (woot)!

Gobble ~ Gobble
Now go & make your little one a fun tee to rock this Thanksgiving!

Sunday, October 9, 2011

Little Ghost Feet

I love this time of year! My little gal & I have so much fun doing craft projects together. When I saw this idea posted on Pinterest, I knew we had to give it a whirl.


We started off with a canvas & painted it black.


Next we made a puddle of white paint for her to wiggle her foot in. She giggled & had a blast. Next carefully place each foot down onto the canvas.


We added some googly eyes and glitter paint (cause everything we do has to sparkle, even ghosts)!
She wrote her name & dated the back of the canvas.


Last, I added some adhesive letters and attached some ribbon using my staple gun so we could hang it!

Easy peasy! I love that every Halloween we'll have a special decoration to cherish from when she was little :)


I'm linking to these fabulous blog parties!

Sunday, October 2, 2011

DIY Ghost Leaves

Boo! Say hello to our new ghost friend created with leaves. Cute huh! Want to make some with your little gobblins? Super easy & so much fun. Let's get started.

You'll need white paint, brush, wiggly eyes, glue and silk leaves (we used small & large sizes).

Paint both sides with the white paint. Let dry & glue on the eyes.
That's it! Super fun Halloween decorations your kids will love to show off!

Love how the ends of the leaves started to fray. Adds to the spookiness!


She's so proud! We hung the big guys in our front window and made a garland with the little ones for her room.

Hope you'll try making a few to add to your Halloween decor!
Thanks for stopping by!

I'm linking to these fabulous blog parties!