Showing posts with label parties. Show all posts

Sunday, November 30, 2014

Vintage Glitter Bulbs

Remember these fun holiday bulbs? Some of you may even still decorate with them! I decided to give them a fab makeover!

Unscrew the bulbs, and coat each one with some Elmers glue. Sprinkle glitter all over & tap to remove excess.
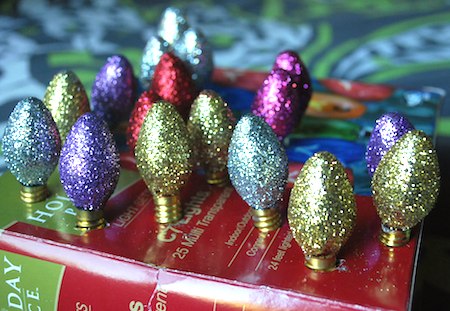
Set to dry & figure out how you will display these sparkling beauties!

On a wreath?
In a bowl?
Gift tags?
Ornaments?

So easy to make & I love the retro feel!

Pin It

Wednesday, November 12, 2014

Thanksgiving Pilgrim Hat Crayon Holder

Thanksgiving is right around the corner & I need some projects to keep my little one busy while we're visiting family. Paper placemats & this pilgrim hat filled with crayons is sure to do the trick!

What you'll need:
Black cups
Black paper
Scrapbook paper
Hot glue gun

Simply cut the bottom out of a black cup (I only had white cups so I sprayed mine with chalkboard paint). Hot glue the cup upside-down to a circle shaped piece of black paper. Cut a band for around the cup & add a scrapbook paper square for the buckle. Simple!

 These would also be adorable at each place setting to hold disposable silverware setting or fill them with candy treats!

Happy Thanksgiving!

Pin It

Sunday, June 1, 2014

Have A Krazy, Kool Summer!

 I can't believe the school year is coming to an end. I'm super emotional my sweet baby will be heading off to second grade in the fall. Where does the time go? I tell her daily she isn't allowed to grow up, but she just doesn't listen :)

 I wanted my daughter to give her classmates one final gift as they head off on summer vacation. We took some silly crazy straws, packets of Kool-Aid & added a fun printable.


 Super easy & inexpensive! Plus who doesn't love a crazy straw?

Wishing you all a krazy, kool summer!

Pin It

Sunday, March 16, 2014

Lucky St. Patrick's Day Fortunes

I love to bring treats to my daughters classroom for any & every holiday. St. Patrick's Day is no different. I found these silly green fortune cookies from Oriental Trading and made a fun printable that I attached to them! Easy peasy.

I think the kids will get a kick out of cracking them open & reading their St. Patrick's Day message!


Pin It

Sunday, March 9, 2014

Pinch Proof St. Patrick's Day!

I love to celebrate St. Patrick's Day! A day filled with leprechauns, rainbows and pots of gold - yes please! Plus do I even need to mention Shamrock Shakes? I've been indulging on them for the last few days! Yum!  

I'm always looking for an excuse to make goodies for friends! This year I decided to make some 'pinch proof' St. Patty's gifts. I purchased some sparkling green nail polishes and attached a fun little tag. Now they'll be sure to be safe from any feisty pinchers!


Do you join in on the green festivities on St. Patrick's Day?

Pin It


Friday, February 28, 2014

Dr. Seuss Green Eggs and Ham

I will eat them in the car
I will eat them going far
I will eat these green eggs and ham
Thank you, thank Sam I Am!

What you'll need:
 Pretzels
Wilton white chocolate melts
Green M&M's
Spread wax paper on a cookie sheet and lay out pretzels on paper. Add one chocolate melt on top of each pretzel. Stick in 350 degree oven for five minutes. 
 Make sure your assistant doesn't eat all the ingredients.

Immediately remove from the oven and press a green M&M on top of chocolate melt. Put in fridge to harden candy.

That's it. Easy peasy right?

I created this bag topper & packaged them up for my daughter's classroom!

Happy Birthday Dr. Seuss!

Pin It

Wednesday, February 26, 2014

Dr. Seuss Day Classroom Treats

 Read Across America Day is a nationwide reading celebration that takes place annually on Dr. Seuss's birthday. Across the country, schools, libraries and communities encourage young minds to pick up a book and read! 

 To mark the celebration, I put together these fun treats for my daughters classroom. I attached Dr. Seuss pencils to an adorable blank printable from Lolly Jane and added one of my favorite quotes. Quick & simple, yet sure to be a huge hit!

The more that you read,
The more things you will know.
The more that you learn,
The more places you'll go.


Pin It

Wednesday, February 19, 2014

St. Patrick's Day Lucky Penny

To celebrate St. Patrick's Day this year, I wanted my little gal & I to do something different for her friends! I was so excited when I stumbled across an adorable 'Lucky Penny' printable from Pumpkin Petunia. In just a few minutes, you can create these cute goodies & spread some cheer!

First you'll need to gather your pennies! We busted into our piggy bank & gathered up as many coins as we could. Upon inspection we realized pennies are d-i-r-t-y. Gross! We wanted shiny coins for our project, so we soaked our pennies in ketchup for 5-10 minutes.

After a quick rinse with water, they are brought back to their shiny golden luster. Crazy ~ but it does work!

Next we printed up some of the 'Lucky Penny' printables available HERE. We added a touch of glitter to the shamrocks for some sparkle & attached each coin with a dab of hot glue.

I also hand-stamped a few pennies to send to family!
Everyone can always use an extra little bit of luck right?


For each petal on the shamrock
This brings a wish your way -
Good health, good luck, and happiness
For today and every day.
~Author Unknown


Pin It


Wednesday, February 5, 2014

Valentine Lollipops

I love Valentine's Day! A day filled with hearts, mushiness & the best part... lots of chocolate - Yes Please! Last year my lil gal & I decided to create some one of a kind Valentine cards for her class. They were so fun, I wanted to share them again this year!

Supplies:
Chocolate candy melts (we used chocolate & white)
Lollipop sticks
Candy canes
Sprinkles
Lollipop bags
Assemble the candy canes & lollipop sticks on a parchment paper lined cookie sheet.

Melt chocolate over a double boiler.

Carefully spoon chocolate into hearts. I twirled the lollipop sticks to make sure they were evenly coated & added some sprinkles. We also made some treats without the sticks.

Yummy!

Add a bag to protect the treats!

For the card I took a picture of her, added a fun Valentine message & printed them on 4x6 photo paper. Using an e-xacto knife, slice above & below the hand, then insert the lollipop stick. Instant cuteness! (The final lollipop version will be in a treat bag)


Happy Valentine's Day!

XOXO

Pin It


Tuesday, January 28, 2014

Recycled Crayon Valentines + Printable

Ever wonder what to do with all those broken & half used crayons? Recycle them into fun shapes for a sugar free Valentine gift!

What you'll need:
Crayons
Heart shaped baking pan
3" bags (purchased from Michaels)
Stapler
Bag Toppers

Let's get started!

Set your oven to 200 degrees. Remove the paper wrappings and break up the crayons. Add them to the  molds and place in oven for 8-10 minutes.
Once all the crayons have melted, you'll get something like this. Next throw the mold in the freezer for a few minutes so the crayons can harden faster.

Pop them out of the mold & you've got yourself some super cute new crayons!

Blank versions of the bag toppers are available HERE!
Just print & have your little one sign their name. Add a couple crayons to the bag & attach the toppers. Easy peasy!

A great Valentine treat without any sugar involved!


Pin It