Showing posts with label crafts. Show all posts

Sunday, November 30, 2014

Vintage Glitter Bulbs

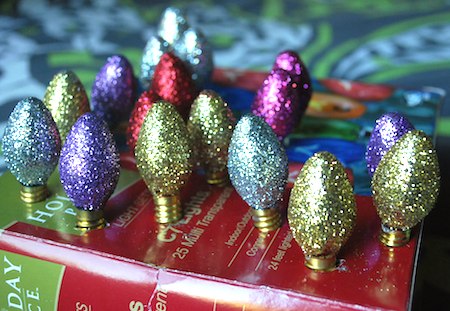
Remember these fun holiday bulbs? Some of you may even still decorate with them! I decided to give them a fab makeover!

Unscrew the bulbs, and coat each one with some Elmers glue. Sprinkle glitter all over & tap to remove excess.

Set to dry & figure out how you will display these sparkling beauties!

On a wreath?
In a bowl?
Gift tags?
Ornaments?

So easy to make & I love the retro feel!

Pin It

Wednesday, November 12, 2014

Thanksgiving Pilgrim Hat Crayon Holder

Thanksgiving is right around the corner & I need some projects to keep my little one busy while we're visiting family. Paper placemats & this pilgrim hat filled with crayons is sure to do the trick!

What you'll need:
Black cups
Black paper
Scrapbook paper
Hot glue gun

Simply cut the bottom out of a black cup (I only had white cups so I sprayed mine with chalkboard paint). Hot glue the cup upside-down to a circle shaped piece of black paper. Cut a band for around the cup & add a scrapbook paper square for the buckle. Simple!

 These would also be adorable at each place setting to hold disposable silverware setting or fill them with candy treats!

Happy Thanksgiving!

Pin It

Friday, October 31, 2014

Halloween Tic Tac Toe - Sugar Free Treat

I love playing games with my daughter. Our latest obsession is tic tac toe. It's great because we can challenge one another to a game virtually anywhere!

When it came time to make Halloween treats for her class (which must be sugar-free) I thought a mini tic tact toe set for each child would be perfect!

 I designed the tic tact toe boards and added fun & spooky bag toppers. Keeping with the Halloween theme, I found some cool bone candies to use as the X & O pieces.

 Hopefully this will get her classmates and their parents (or siblings) playing together and creating memories to last a lifetime!

Happy Halloween!

Pin It


Sunday, September 28, 2014

Sugar-Free Halloween Treats - Pumpkin Crayons

Fall is finally here & I'm in full force holiday craft mode! Woot!
I wanted to share my daughter's classroom treat we did last year. Her school is sugar-free so I was faced with a challenge to come up with a cool idea!  

 While I was racking my brain for a sugar-free classroom treat, my lil gal lost another tooth. Eek! I told her she had the perfect pumpkin smile & then an idea dawned on me...
Boxes of crayons disguised as pumpkins!

Sugar-free & what kid doesn't love crayons? A win-win to me :)

Five made and twenty-one (!!!) more to go!

What you'll need:
Box of crayons
Scrapbook paper
Glue stick
Paper punches (1-hole, circle & scallop)
Bakers twine (or make your own here)

Two of the scrapbook papers I used are available to download for free:
Pumpkin face template
Get the adorable gift tag & other Halloween free printables here!

 Happy Halloween my pretties!

Pin It


Monday, May 26, 2014

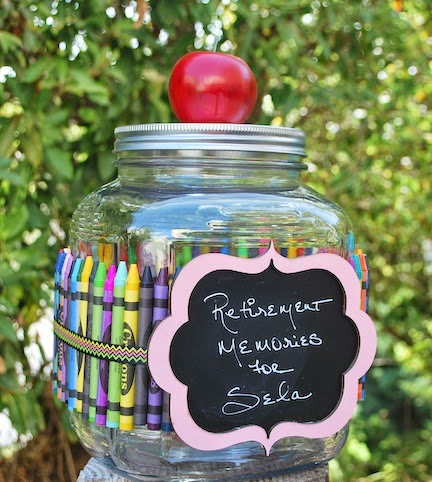
Teacher Retirement Memory Jar

My daughter's school has three wonderful faculty members retiring this year; a kindergarten, first grade and second grade teacher.

The PTA commissioned me to create special gifts for each of them. Since they all have worked at the school for many, many years, what better than memory jar filled with all their awesome moments to be cherished for years to come! 

While a plain jar would have been fine, I wanted the jars to be displayed in their homes so they needed to be decorative & cute! I added some crayons, ribbon, faux apples & fun chalkboard signs.

Each jar was slightly unique & perfect for each teacher. I'm so happy with how they turned out and can't wait for them to be presented at their big retirement celebration.

 
Pin It

Thursday, March 13, 2014

St. Patrick's Day Clover Hair Clip

St. Patrick's Day is right around the corner & I want to make sure my daughter and her girlfriends avoid the celebratory pinches from classmates. 

With some green felt, ribbon and crystal embellishments I whipped up these fun clover hair clips!

100% leprechaun approved!

Pin It


Thursday, February 13, 2014

DIY Chalkboard Picture Frame

Looking for a unique and homemade Valentine's Day gift?
How about a chalkboard picture frame? Now you can leave love notes for your sweetie all year long!

First you'll need a cute assistant and a wooden picture frame. We picked this one up at Michael's for just $1. I like that it has a large area to write your message!

You'll also need a can of chalkboard spray paint (available at Michael's)

Now get spraying! I applied three coats (allow for drying in between coats)

A few rhinestone added for a sparkling finish touch and that's it!
Quick, easy & your Valentine is sure to love it!

These would also make amazing wedding favors. Attach a piece of chalk with coordinating ribbon and you've got a one-a-kind favor for your guests.

Pin It


Tuesday, January 28, 2014

Recycled Crayon Valentines + Printable

Ever wonder what to do with all those broken & half used crayons? Recycle them into fun shapes for a sugar free Valentine gift!

What you'll need:
Crayons
Heart shaped baking pan
3" bags (purchased from Michaels)
Stapler
Bag Toppers

Let's get started!

Set your oven to 200 degrees. Remove the paper wrappings and break up the crayons. Add them to the  molds and place in oven for 8-10 minutes.
Once all the crayons have melted, you'll get something like this. Next throw the mold in the freezer for a few minutes so the crayons can harden faster.

Pop them out of the mold & you've got yourself some super cute new crayons!

Blank versions of the bag toppers are available HERE!
Just print & have your little one sign their name. Add a couple crayons to the bag & attach the toppers. Easy peasy!

A great Valentine treat without any sugar involved!


Pin It


Thursday, December 5, 2013

DIY Chalkboard Coasters

The holidays are right around the corner which means a calendar filled with lots of social gatherings! This year I wanted to create a fun hostess gift to pair with a bottle of wine/cider/etc.  

What you'll need:
Chalkboard spray paint
Ceramic tiles
Cork sheets or felt
Adhesive or hot glue gun
Chalk

Lay out your tiles and spray with chalkboard paint. I did two coats and allowed one hour drying time between coats.

In the scrapbook section of Michael's, I found some awesome cork sheets that I cut to fit the back of the tile. You could also use felt. These will protect the tile from scratching furniture surfaces. Spread a layer of glue and attach to the tile. Let dry.

Now guests can write their name, doodle and keep track of their drinks.

 
 When the fun is done, clean up is a breeze.
Simply wipe down with a damp cloth and let air dry. 

 Wrap the tiles with some pretty ribbon and a piece of chalk and 
you've got a fun, affordable and unique gift!

Pin It

Tuesday, December 3, 2013

Bubble Wrap Advent Calendar

 Looking for a cute, clever and inexpensive advent calendar?

What you'll need:
Round label stickers
Large bubble wrap
Sharpie Pen
Scissors

Using the bubble wrap, cut out a Christmas tree shape. Take the labels and have your little ones write out numbers 1-24. Place one sticker on each bubble. You can place them in numerical order or to make it more of a hunt, place them in random order.

Who can resist the joy of popping bubble wrap? I personally have no self control, so I'll leave this one for my daughter to enjoy! Haha!

Pin It

Sunday, November 17, 2013

Thanksgiving Pilgrim Hat Crayon Holder

Thanksgiving is right around the corner & I need some projects to keep my little one busy while we're visiting family. Paper placemats & this pilgrim hat filled with crayons is sure to do the trick!

What you'll need:
Black cups
Black paper
Scrapbook paper
Hot glue gun

Simply cut the bottom out of a black cup (I only had white cups so I sprayed mine with chalkboard paint). Hot glue the cup upside-down to a circle shaped piece of black paper. Cut a band for around the cup & add a scrapbook paper square for the buckle. Simple!

 These would also be adorable at each place setting to hold disposable silverware setting or fill them with candy treats!

Happy Thanksgiving!

Pin It

Monday, November 11, 2013

Thankful Tree

We're giving thanks in a new way this holiday season with our Thankful Tree! I'm so excited about this new tradition we started this month, reflecting on what we are thankful for and noting every day.
First we painted a 11x11 canvas. Using some polka dot fabric, I cut out the shape of a tree and mod podged the fabric to the painted canvas. Our base is set & can be used year after year.

Each morning my daughter grabs a blank leaf & we jot down one thing she is thankful for. We add a piece of double sided sticky tape to the leaf & attach it to the canvas. By the time Thanksgiving rolls around, our tree will be full.

We try to instill gratitude every day, but sometimes life has a way of distracting us. This a wonderful way to create positive and nurturing thoughts. Plus it's a great way and reminder for little ones to learn what really maters.

Pin It