Showing posts with label paint. Show all posts

Saturday, October 11, 2014

Halloween Ghost Feet

I love this time of year! My little gal and I have so much fun doing craft projects together. When I saw this idea posted on Pinterest, I knew we had to give it a whirl.

We started off with a canvas and painted it black.

Next we made a puddle of white paint for her to wiggle her foot in. She giggled and had a blast. Next carefully place each foot down onto the canvas.

We added some googly eyes, adhesive letters and glitter paint 
(cause everything we do has to sparkle, even ghosts)!
She wrote her name and dated the back of the canvas.

Last, I attached some ribbon using my staple gun so we could hang it!

Easy peasy! I love that every Halloween we'll have a special decoration to cherish from when she was little :)

Pin It


Sunday, March 9, 2014

Pinch Proof St. Patrick's Day!

I love to celebrate St. Patrick's Day! A day filled with leprechauns, rainbows and pots of gold - yes please! Plus do I even need to mention Shamrock Shakes? I've been indulging on them for the last few days! Yum!  

I'm always looking for an excuse to make goodies for friends! This year I decided to make some 'pinch proof' St. Patty's gifts. I purchased some sparkling green nail polishes and attached a fun little tag. Now they'll be sure to be safe from any feisty pinchers!


Do you join in on the green festivities on St. Patrick's Day?

Pin It


Thursday, February 13, 2014

DIY Chalkboard Picture Frame

Looking for a unique and homemade Valentine's Day gift?
How about a chalkboard picture frame? Now you can leave love notes for your sweetie all year long!

First you'll need a cute assistant and a wooden picture frame. We picked this one up at Michael's for just $1. I like that it has a large area to write your message!

You'll also need a can of chalkboard spray paint (available at Michael's)

Now get spraying! I applied three coats (allow for drying in between coats)

A few rhinestone added for a sparkling finish touch and that's it!
Quick, easy & your Valentine is sure to love it!

These would also make amazing wedding favors. Attach a piece of chalk with coordinating ribbon and you've got a one-a-kind favor for your guests.

Pin It


Thursday, December 5, 2013

DIY Chalkboard Coasters

The holidays are right around the corner which means a calendar filled with lots of social gatherings! This year I wanted to create a fun hostess gift to pair with a bottle of wine/cider/etc.  

What you'll need:
Chalkboard spray paint
Ceramic tiles
Cork sheets or felt
Adhesive or hot glue gun
Chalk

Lay out your tiles and spray with chalkboard paint. I did two coats and allowed one hour drying time between coats.

In the scrapbook section of Michael's, I found some awesome cork sheets that I cut to fit the back of the tile. You could also use felt. These will protect the tile from scratching furniture surfaces. Spread a layer of glue and attach to the tile. Let dry.

Now guests can write their name, doodle and keep track of their drinks.

 
 When the fun is done, clean up is a breeze.
Simply wipe down with a damp cloth and let air dry. 

 Wrap the tiles with some pretty ribbon and a piece of chalk and 
you've got a fun, affordable and unique gift!

Pin It

Monday, November 11, 2013

Thankful Tree

We're giving thanks in a new way this holiday season with our Thankful Tree! I'm so excited about this new tradition we started this month, reflecting on what we are thankful for and noting every day.
First we painted a 11x11 canvas. Using some polka dot fabric, I cut out the shape of a tree and mod podged the fabric to the painted canvas. Our base is set & can be used year after year.

Each morning my daughter grabs a blank leaf & we jot down one thing she is thankful for. We add a piece of double sided sticky tape to the leaf & attach it to the canvas. By the time Thanksgiving rolls around, our tree will be full.

We try to instill gratitude every day, but sometimes life has a way of distracting us. This a wonderful way to create positive and nurturing thoughts. Plus it's a great way and reminder for little ones to learn what really maters.

Pin It


Wednesday, October 16, 2013

Ghost Leaves Kids Craft

Boo! Say hello to our ghost friend created with silk leaves. Super easy & so cute. We made these little ghouls last year & thought it'd be fun to bring them back! Want to make some with your little goblins? Let's get started.

You'll need white paint, brush, wiggly eyes, glue and silk leaves (we used small & large sizes).

Paint both sides with white paint. Let dry & glue on the eyes. That's it! Super fun Halloween decorations your kids will be proud to show off!

Love how the ends of the leaves started to fray. Adds to the spookiness!

She's so proud! We hung the big guys in our front window and made a garland with the little ones for her room.

Hope you'll try making a few to add to your Halloween decor!
Thanks for stopping by!

Pin It

Sunday, September 22, 2013

Halloween Ghost Feet

I love this time of year! My little gal and I have so much fun doing craft projects together. When I saw this idea posted on Pinterest, I knew we had to give it a whirl.

We started off with a canvas and painted it black.

Next we made a puddle of white paint for her to wiggle her foot in. She giggled and had a blast. Next carefully place each foot down onto the canvas.

We added some googly eyes, adhesive letters and glitter paint 
(cause everything we do has to sparkle, even ghosts)!
She wrote her name and dated the back of the canvas.

Last, I attached some ribbon using my staple gun so we could hang it!

Easy peasy! I love that every Halloween we'll have a special decoration to cherish from when she was little :)

Pin It


Sunday, July 28, 2013

DIY Fiesta Cascarones (Confetti Eggs)

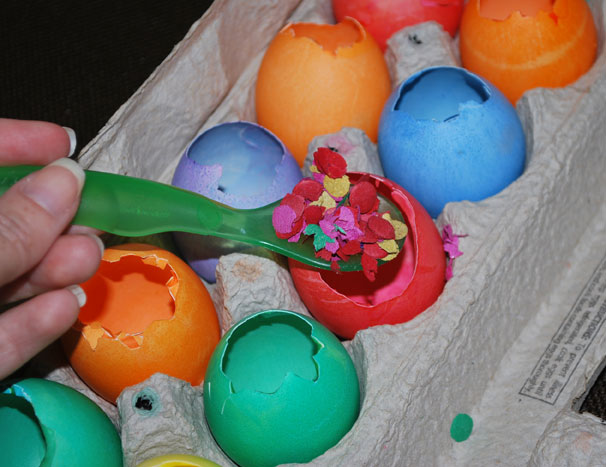
Every year I look forward to a huge five day Fiesta celebration called Old Spanish Days! Aside from all the delicious food, the next best treat are the confetti eggs (aka Cascarones). They are egg shells filled with confetti that you crack over someone's head and shower them with the confetti inside.

Want to whip some up with the kids? Let's get started!

What you'll need:
  • Uncooked Eggs
  • Confetti
  • Tissue paper
  • Glue
  • Scissors
  • Egg dying kit
  • Pens, crayons, glitter, spray paint, etc...
 1. Tap a small piece of the top of the egg off.
2. Empty out the contents of the egg.
3. Wash the inside of the shell with water. Let dry.
4. Dye the eggs per egg dying kit instructions.
5. Set them to dry again with the hole facing down. I used stick pins on egg cartons to allow the dye to drip off.

6. Fill the eggs with the confetti.
7. Apply glue around the top perimeter of the egg.
8. Secure a square of tissue paper on top.
9. For an extra touch paint designs or add glitter for some sparkle.
10. Let the smashing begin :)

Be warned! Confetti will be everywhere... For days.

 Viva La Fiesta!

Pin It

Monday, April 1, 2013

Plastic Egg Tea Cups

Now that Easter is over, ever wonder what to do with all those leftover plastic eggs? With just a few items you can turn them into fabulous play tea cups!

What you'll need:
Plastic Eggs
Glue Gun
Paint & Brush
Buttons
Embellishments (glitter pens, rhinestones, ribbon, etc.)

First let your little one(s) decorate those eggs!
Pens, paint, glitter, stickers... whatever their little creative mind can come up!

Then glue a button to the bottom of each egg.

We glued some pearls together to create a handle.
This tea cup is my favorite!

That's it! You're done!
The perfect addition to every play kitchen!
(and always remember pinkies out! Ha!)


 Now get those plastic eggs & start creating :)


Pin It